Home » Top Automation Anywhere Interview Questions & Answers
Here are top Automation Anywhere interview questions & answers. If you are looking for RPA Automation Anywhere job as a fresher or experienced and not sure about the questions which are asked in the interview. EmergenTeck has got you covered. Get ready for your RPA UiPath interview with our comprehensive list of top interview questions and expert answers.
There are many benefits of Automation Anywhere such as:
In the v11, there was a limitation on the commands and packages, whereas, in A360 there are various packages and commands which helps us to implement the task easily.
In v11, the Object Cloning is used to capture and in A360, the Recorder package is used. Also, the Meta bot is not available in A360.
And finally, the Community Edition is available for A360 whereas, currently it is not available for v11.
The Automation Anywhere is used to implement the tasks which are repetitive and time consuming. It is also used to reduce the human efforts and increase the accuracy of the work by reducing the errors.
In Automation Anywhere, the four different frameworks are used as mentioned below:
The Automation Anywhere uses the Distributed Architecture. It consists of different components such as Bot Agent, Database, Bot Creator and Runner, etc. The Bot Creator and Bot Runner are connected to the Control Room, and the Control Room acts at Server Level and the Bot Creator and Bot Runner acts at user end level.
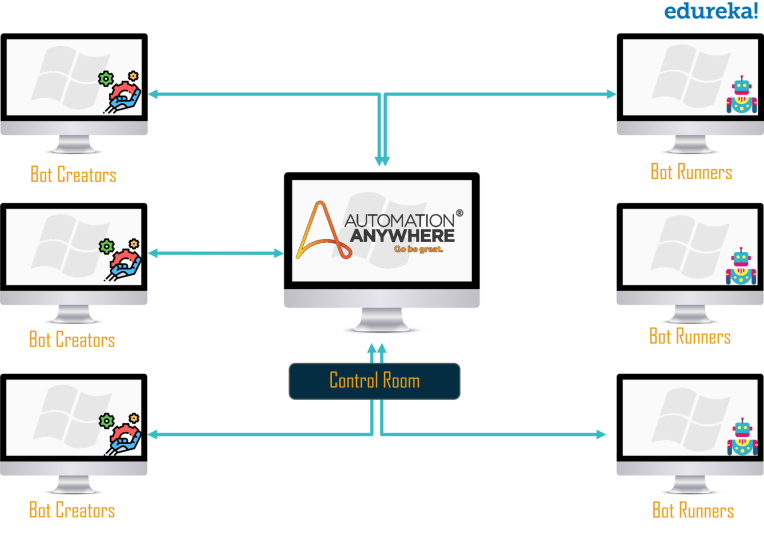
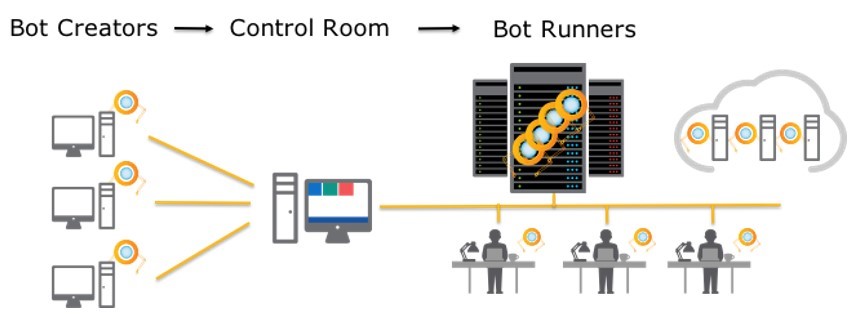
The Automation Anywhere Web based Control Room is the central point where we can access and control the bot execution, the bots can be uploaded and downloaded for collaboration. The Control Room also provides the single view of the entire automation infrastructure and it has Role Based Access Control (RBAC) which provides secure access.
The Bot Creator client is the one which can able to create the automation in the Private Repository and it can be tested by running in the creator client. The code can be edited by the Bot Creator.
The Bot Runner Client has only the permission to run the bot in the Attended or Unattended mode in the Public Repository. If any change is to be done in the code, then the Bot Runner is not allowed to edit the code.
The Bot Insights is a platform which provides the real time, interactive and the insight details regarding the Business processes. The Bot insight provides the details about the content and productivity data about the bots that has been deployed. Also it gives details about the process, interacted data by the bot and the data that bot has generated. From this data, the analytics are generated and it can be observed with the help of customizable dashboards.
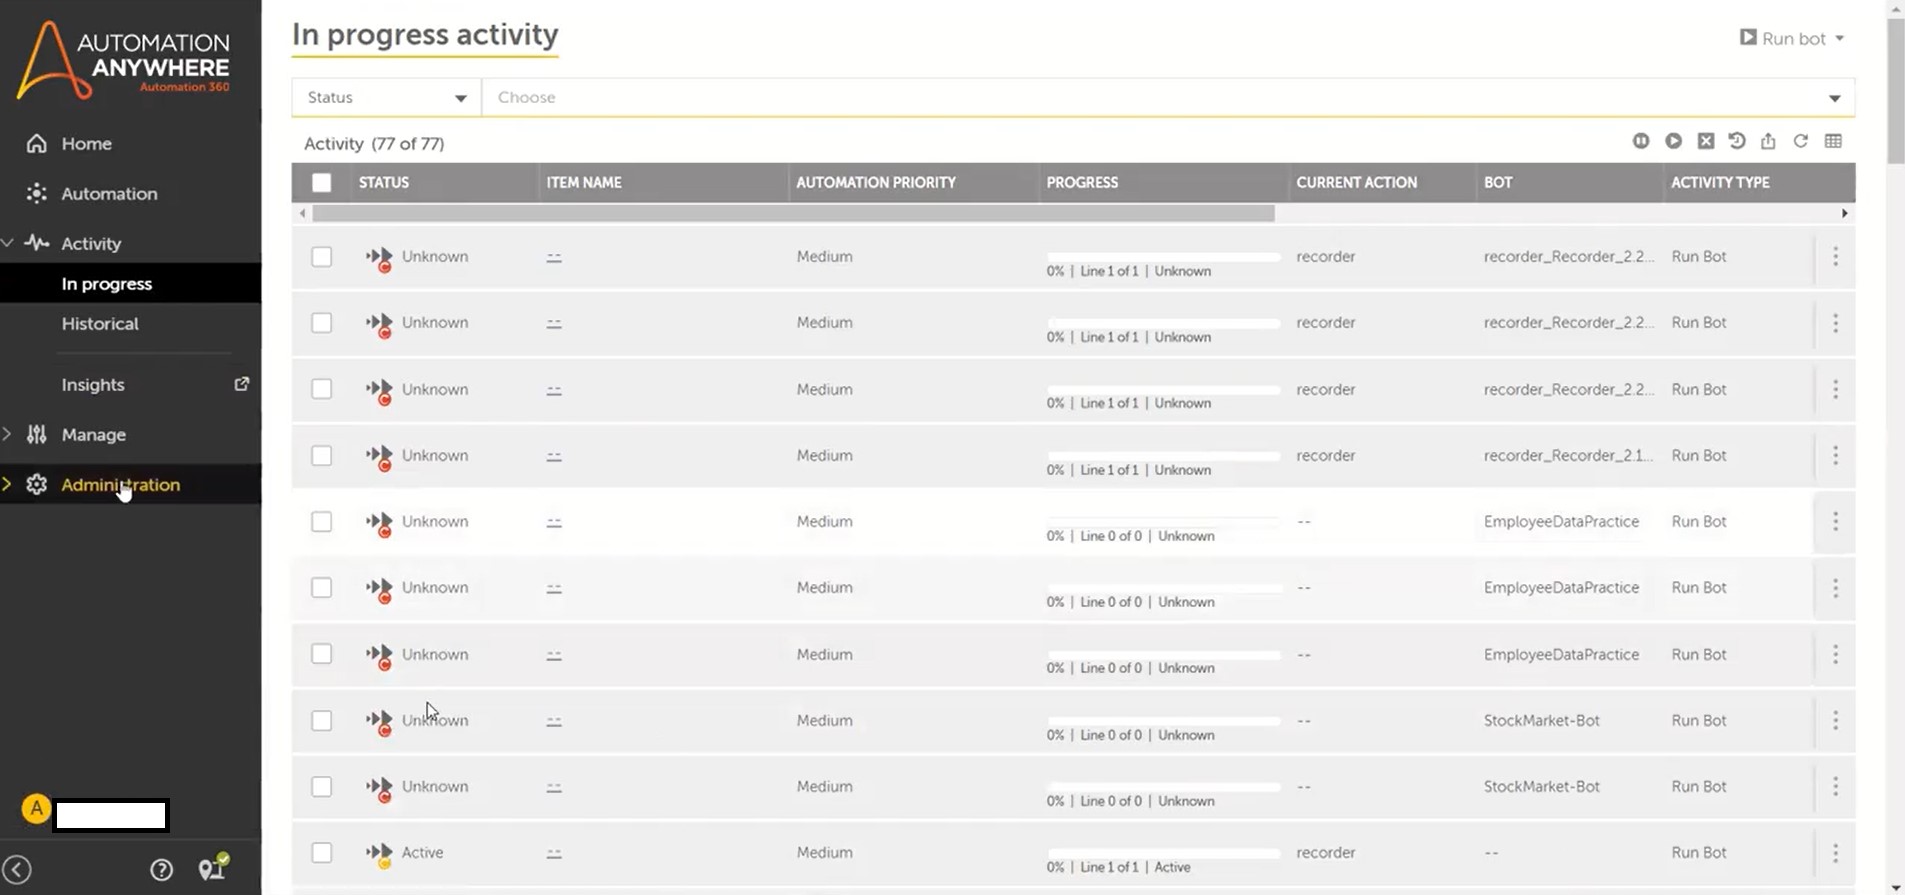
The Activity tab from the Control Room Dashboard has In Progress, Historical, and Insights tab. The In Progress activity shows the bots that are currently running. The bot status has the different status such as Started, Active, Paused, Unknown, Paused for Input, Pending Execution and Queued.
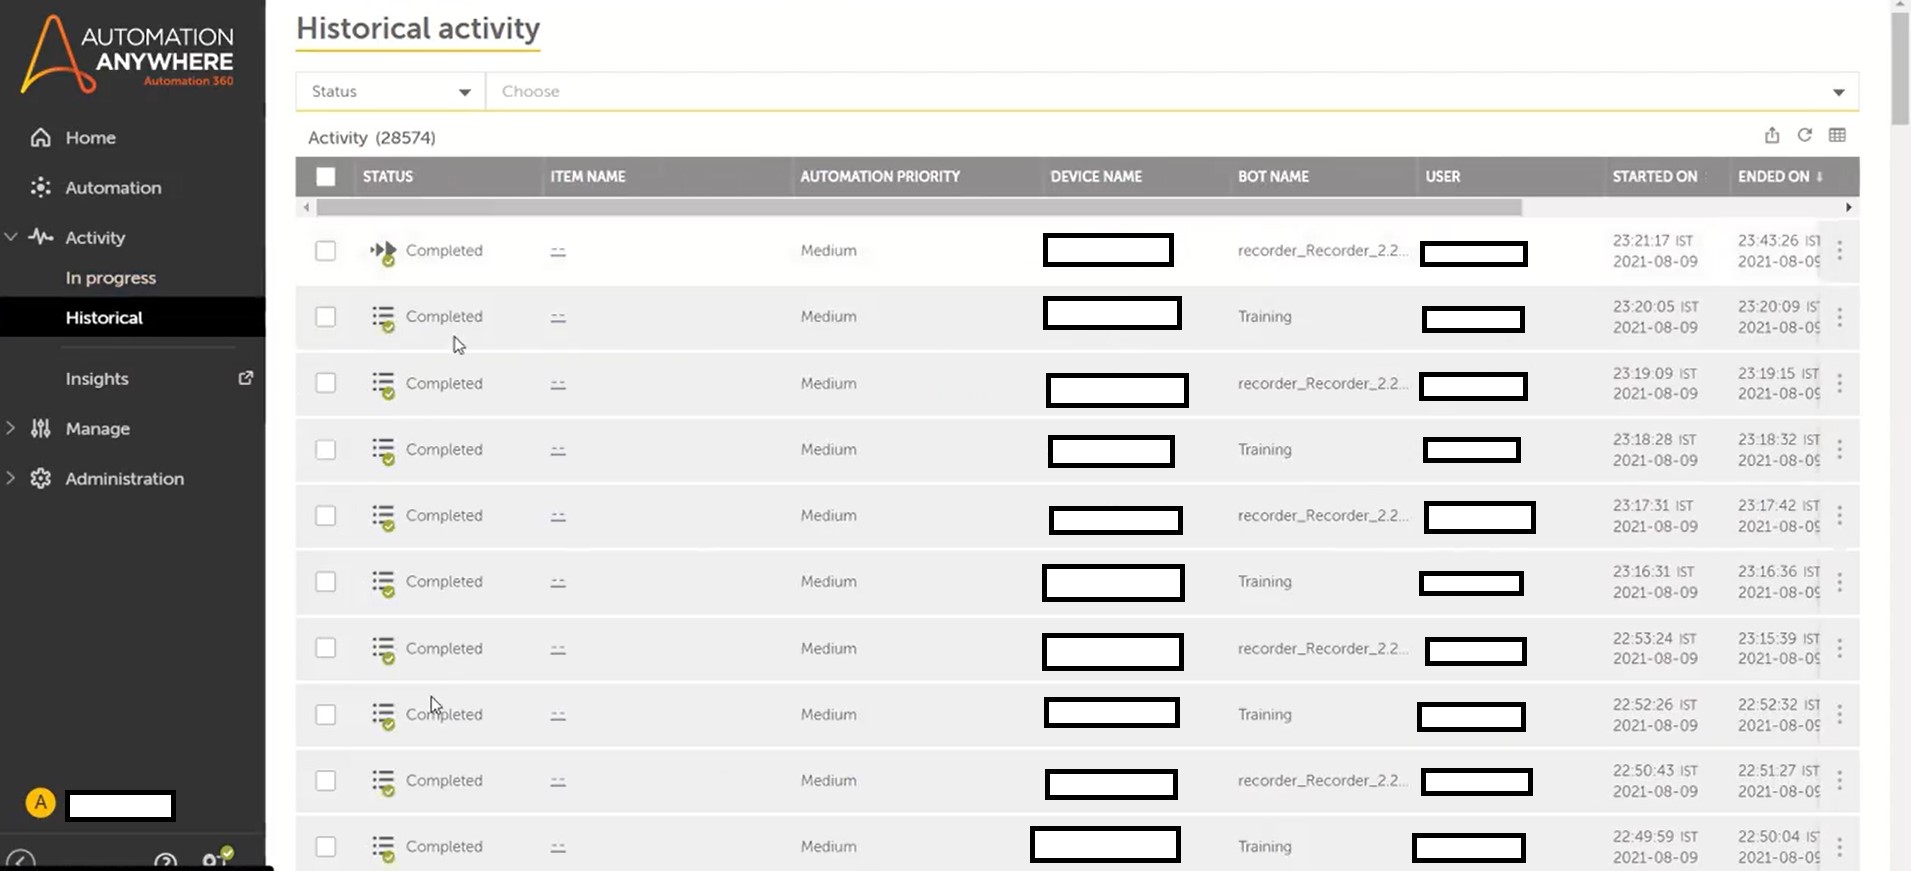
Historical Tab: The Historical tab shows the bots that are executed and exported from the Control Room. The status of Historical tab includes the various statuses such as: Completed, Failed, Stopped, Timed out, Unknown, Deploy failed and Pending execution.
The Roles and Permissions are manages in the AA Control Room by using the Role Based Access Control (RBAC).
The AAE_Admin role has permissions to create, view, edit, delete and enable or disable user.
The AAE_Basic role has the permissions to upload and download Task Bots and other few permissions such as view packages, view and run the bots, register device, view bot store, etc.
AAE_Bot Developer has permissions to Run, Import bots and Create folders, Create attributes for credential, View and Manage Packages, View basic information of Users and Roles.
AAE_Locker Admin can view all the credentials and lockers. Also they can View basic information of Roles and Users.
AAE_Pool Admin can view and manage all the device pools. They can view and manage Bot Runners, Bot Creators, and device pools. Can create device pools and Administer all device pools.
AAE_Queue Admin has permissions to manage and view all queues. Also he can create Queues, Export Queues and Import Queues.
AAE_Bot Migration Admin has permissions to view and manage the bot migration process. Also he can view and run the bots, manage credentials and lockers and create, edit & view attributes for a credential. Along with this, he can register device, view & manage bot runners, bot creators and device pools. In terms of Administration, he can view & manage migration.
The Repository is managed by the by the Role Based Access Control (RBAC). The users will be provided the access as per the requirement and permissions needed. This will be good to manage the control room.
To run the task from Control Room, we should be logged in to the Control Room as Bot Creator or Bot Runner user. The Task can be executed from the Creator user from the Private Repository using command of Run bot. The Task can be executed from the Runner user from the Public Repository using the Run bot option.
The scheduling Tasks in control room refers to the tasks that we can set a specific time to run the task bot on their own. This scheduling has options to set as Daily, Weekly or only on specific day to run. Along with the day, we can set the time to run the bot with different time zones individually.
The Audit Trail refers to the Log or the Activity details that are performed by the bot in the run time. The Audit trail/log gives the information about the each action performed by the bot. If the bot is failed and we need to check up-to which action the bot has processed, so we can easily check it by looking at the Audit log details.
The credential manager is used to store the sensitive information such as passwords, and some other sensitive information.
Credential: The Credential stores the sensitive information in Attributes. For example: the Gmail credential can contain two attributes such as username and password.
Locker: A locker specifies that which specified users can view, access or modify the credentials. A user with AAE_Locker Admin can configure locker, grant access to other user and add credentials.
The task bot can be defined as the set of automation steps which are repetitive and rule based. The steps can contain different actions from the packages. The task bot can be called from Main task or sub task to be executed.
The Recording task refers to the capturing the steps that will be performed by the bot. It includes the clicking on object or button, selecting checkbox, set text or keystrokes performed. This will save the time for recording all the steps instead of recording each step individually.
The creating Task refers to the Create New tab from the Control Room’s Automation dashboard. For creating the Task Bot, we need to navigate to the Create New and select the Task Bot from the options. This will create a Task bot where we will be performing and adding the steps as per requirement from the end user.

The edit task option is available in the Private Repository only and in the Public Repository, we can only see & Run the code but unable to edit. In the Private Repository, we need to open the code and then we can edit the code as per requirement.

The Run Task option is available in the Private as well as in the Public Repository.
Run Task from Private Repository: The task can be executed on the same machine on which the code is being edited.
Run Task from Public Repository: The task can be executed on any available runner machine from the Public Repository in the Attended or Unattended mode.

The task can be scheduled from a Bot Runner user login. After login to the Control Room with Bot Runner login credentials, we can navigate to the Schedule Bot Run option and set the tasks to run on the particular days, weeks or months of the year.
The variable manager shows the variables that are being used in that particular task. From the variable manager, we can add, modify and copy the variables within the automation tasks. The different operations such as Copy, Copy All, Paste, Add a new variable, Edit a variable, Delete a variable can be performed using the Variable Manager.
The web based and Desktop based applications can be recorded with the help of Capture action under Recorder package. For the web based & Desktop based applications, the object properties can be set depending upon the object that is being captured.
There are total 4 different types of Universal Recorders such as:
Object (auto-detect): This technology is used to capture the objects. Whenever we hover on the objects, the object gets highlighted and we can click on that to capture it.
Microsoft Active Accessibility (MSAA): This technology is based on the Component Object Model (COM) which is operating system to communicate and mechanism for the applications to capture objects.
Microsoft UI Automation: It is the accessibility framework used for the Microsoft Windows. The UI Automation mostly provides access to all the user interface elements on the screen. This recorder can be used where the regular recorder is not able to capture objects.
Microsoft UI Automation (COM): The UI Automation (COM) is used to capture the various controls such as Button, Calendar, Check box, Combo box, Label, Link, List view, Menu, Page tab, Radio button, Table, Text box, etc. This automation works faster than the UI Automation. And while recording, if the object that we are trying to capture is not supported, then it will be highlighted by a grey highlight around that object.
Along with this, there is a Screen Recorder which is used for the desktop based applications. The Smart Recorder can be used for both desktop and web applications. The Web Recorder can be used for the web-based applications.
The Wait for Condition is the command in which we can delay the bot until a specific condition is True before executing the next action. This includes various conditions such as Application running or not running, Boolean condition, Data Table conditions, Datetime condition, Dictionary condition, DLL Session condition, File condition, Folder condition, Image Recognition, JavaScript condition, List, Number, String condition, etc.
Loops: The Loop action is used to repeat the set of actions in a loop until a break occurs. The Loop can be run n number of times or for the CVS/Text file data, for Data-table or Database, for Dictionary, for Email, for data in Excel, for Files and Folders, for List, for Microsoft 365 Calendar, Excel, Outlook and for XML data.
The If Else command is used to execute the set commands only when the condition inside If condition is satisfied. Otherwise, the execution flow will navigate to the Else command and the commands inside Else will be executed. The various conditions under If condition are Boolean, Data Table, Datetime condition, DLL Session, File & Folder condition, Window condition, etc.
Using the String operations, we can compare the two strings; retrieve the length of the string, extracting specific part of string using the delimiters or indexing, conversion of string to Uppercase or to Lowercase.
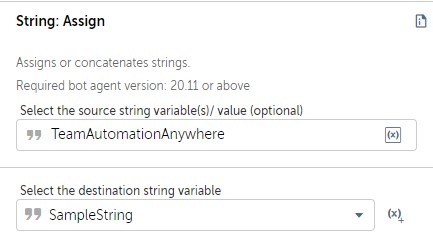
The assign the string to a variable, we need to use the Assign command from the String package. In the image below, the string is being assigned to the SampleString variable. We can assign or concatenate the multiple variables to a single string variable using the Assign command.
All of the mentioned commands come under String package. Let’s discuss it one by one.
Extract Text: This command will extract the range of text with the help of logical operators from the source string. For this, the different conditions can be used such as After, Before and/or after, and Before.
Split String: The Split string will split the specific string into multiple strings using the mentioned delimiter and the output is stored in the list variable.
Trim String: The Trim string command Trims the blanks in between, whitespaces & tabs in between and line breaks from the source string.
Replace String: The Replace string command will first find the piece of text from the source string and then it will replace with another text.
Compare String: The Compare string command will compare the source string with the another string and gives the result in Boolean format.
In order to generate the random string, we need to use the String package. This command generates a string of combination of uppercase and lowercase alphanumeric characters and it will be assigned to a string variable.
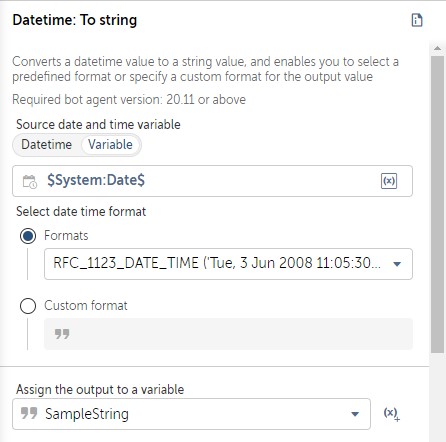
In order to get the system date into the String format, we need to use the Datetime: To string action from the Datetime package. In this conversion, we need to provide the System variable $System:Date$ as an Input and the output is in the form of string. For the output string, the different formats are available in the dropdown menu through which we can select the required one or we can get it in the Custom format as well.
If there is a need to convert the given set of string into the Lower case or Upper case, we can use the Lowercase command and Uppercase command respectively.
The required string can be found or extracted using the Find command from the String package. For reversing the given string, we have to use the Reverse command from the String package. The output is in the String format in both of the cases.
For the Excel Automation, we have two different packages such as Excel Advanced and Excel Basic. Using the commands from both of the packages, we can automate the tasks performed with Microsoft Excel spread sheets.
The major difference between these two packages is that, we can use Excel Advanced package when the Microsoft Excel is installed on the device and whenever the Microsoft Excel is not installed on the device, we have to use the Excel Basic package.
Using the commands from these packages we can create workbook, delete cells, filter, get multiple cells, Insert/Delete rows/columns, save workbook, open , close, etc.
The different tasks related to Windows in Web Automation can be performed such as activating the window, close application window, Minimize / Maximize / Resize / Restore window, and assigning a new window title to a window variable, etc.
The web automation with excel can be implemented in different ways such as:
Reading the column data from excel and filling the same in the web form.Reading the data from the web / web applications and storing the same in the excel sheet.
Generating the Summary file after processing all the data from excel into the web application.
For the Desktop Application Automation, we can use the Open program/file command from the Application package. After opening the application, then with the help of Recorder, Keystroke we can perform the navigation and other operations involved in the process.
The various commands related to Files and Windows are as follows:
File: Using the File package, we can automate various file related operations. The various operations can be performed such as Copy desktop file to another location, Create / Delete a file, Copy the file from Control Room to specific location, get the name & path of file, open the existing file, print the file, rename file, and create a shortcut to a target file.
Windows: The different tasks related to Windows in Web Automation can be performed such as activating the window, close application window, Minimize / Maximize / Resize / Restore window, and assigning a new window title to a window variable, etc.
The Pause Task command is used to pause the execution of the currently processing task.
Delay: The delay is the amount of time a bot waits before moving to the next task. It is a static delay.
Wait: Using this package commands, we can add a condition to wait for an application screen to change or the specific window to open / close before moving to the next action. The wait acts as a Dynamic delay.
The Email automation allows us to automate the email related tasks: such as send email, save attachments, reply, move an email, forward the email with attachments to one or more recipients, to connect with the email server, terminate the connection with email server, delete a specific email from the inbox, check if the specified name of the folder exists and change the status of emails to read or unread. All these commands are available under the Email package.
The Read from CSV/Text command is used to read the values from a CSV or a Text file. After reading the values, we can insert them in to a Table variable for further processing. From the Data table, we can extract & use the individual data values one by one.
The ODBC stands for Open Database Connectivity. The ODBC is an Application Programming Interface (API) which provides access to the database management systems. In Automation Anywhere, the Connect action under Database package is used to establish connection with the database server. This Connect action supports Microsoft access, MySQL, PostgreSQL Server, Microsoft SQL Server, Oracle and SQLite database servers. Along with this, we can use the CSV, Microsoft Excel and TXT files as database and able to do the processing as database only.
In Automation Anywhere, the Database can store variety of data such as sales transactions, product catalogues, customer profiles and inventories. Using the Database package, we can connect to a database; manipulate the stored data by retrieving, deleting, inserting, exporting and updating it to the CSV file. Also we can Begin database transaction and End database transaction.
The Prompt package is used for the operations such as entering the value from user in the run time, requesting a yes or no response, for selecting the one or more files during the bot execution, and to choose the folder during run time. These commands are used in the attended mode run only.
We hope you find these Automation Anywhere interview questions valuable. If you have any further questions that you would like answered, please contact us here: https://kausalvikash.in/contact/
Free Online Masterclass | How to Get Started with Intelligent Automation?
Wed 31 Jul
9-10 PM IST
© 2017-2024 Emergenteck Training And Development Services LLP. All Rights Reserved.
WhatsApp us
Thanks for showing interest.
Please complete your registration process and your expert team will come back to you with Demo/Training details.